April 27, 2012

Braised Chicken in Tomato sauce

This particular recipe is quite dear to me since I had first coined it probably 10 years ago and have been relying occasionally on it ever since. Back then, I used to live as a paying guest in Hyderabad and being away from home was definitely hard on my ever craving palate. I used to really long for good, warm, home-cooked food that whenever a cooking opportunity presented itself, I would usually jump in along with my roommates and whip up something that we would really crave. My friends really loved this dish when I first made it and ever since, this has been a keeper for me. I believe that these were also my first 'baby steps' towards enjoying cooking and developing a deeper interest in the culinary arts!


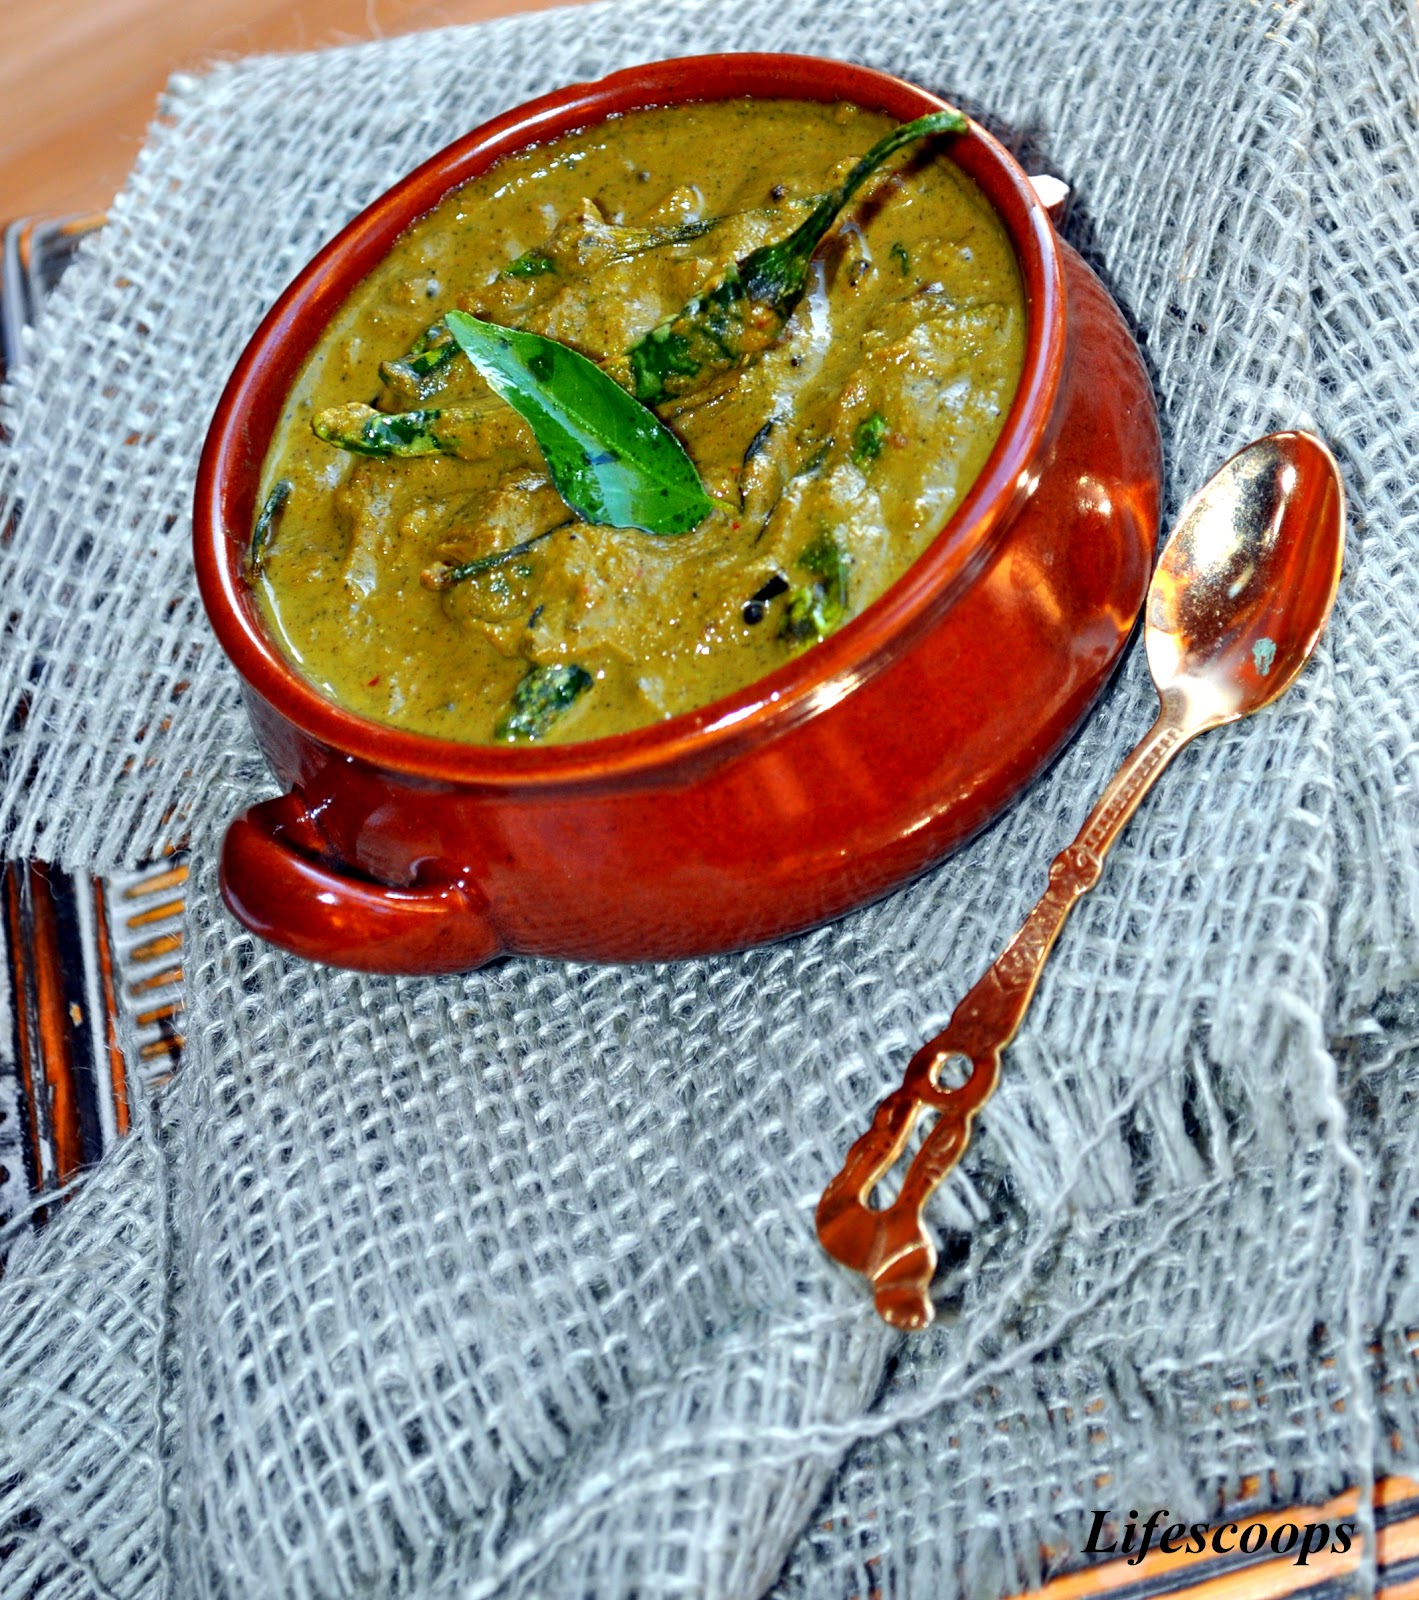
 The Soy-sauce marinated chicken is first seared, browned and then cooked in a simple tomato-based sauce. A very simple and easy-to-make recipe with few ingredients but tastes nothing less of sophisticated, this is one dish that is geared to please,  


Serves 8

Ingredients
1 whole - Chicken (approx 4 3/4 Lb)
15 cloves - Garlic
2 1/2 inch - Fresh ginger
1/4 Cup - Soy Sauce
1 Tsp - Chilly powder
6 - Big Tomato
3/4 Tsp - Pepper
Salt
Oil
2-3 - Jalapenos

Direction
  • Grind the ginger and garlic into a fine paste 
  • Marinate the chicken with soy sauce, ginger garlic paste, chilly powder and salt. Allow it marinate for 2 hours. 
  • Heat oil in a heavy-bottomed non-stick pan and shallow-fry the chicken until all the pieces are cooked through and browned. 
  • While the chicken is cooking, add some tomatoes to another non-stick pan. Season with salt and pepper and cook it covered for 15 minutes.Do not add water. After the tomatoes cool, transfer it to a blender to make a puree. 
  • Add tomato puree to the cooked chicken and cook. 
  • Garnish with sliced Jalapenos

April 24, 2012

Gorgonzola Stuffed Burgers


Crafting together your own Homemade burgers provides a great channel for your culinary creativity as well as a means to satisfy your insatiable cravings for one of these juicy delights. What could make them even more tempting and appetizing would be to stuff them with a lot of your favorite cheese, Oh Yeah baby!! Biting into one of these spiced up juicy bad boys with creamy Gorgonzola in the center is sure to fire up those taste buds!


Gorgonzola is a member of the blue cheese family of cheeses. It is an uncooked cheese that has a white appearance with blue-green veins throughout. In the past, Gorgonzola could take upto one year to mass-produce because of its long aging process but these days, modern technology provides means to expose the cheese more rapidly to oxygen thereby shortening the aging process down to around three to six months. Gorgonzola cheese can be of the young or more aged variety; the longer aged version called Dolce is creamier and milder and commonly finds use in sauces and spreads. Piccante or Naturale Gorgonzola are the younger aged varieties, which are sharper in taste, more crumbly and therefore, good additions as garnish on prepared dishes or simply as a stand-alone snack

Yields 4 burgers

Ingredients
For Burger patty
1 Lb – Ground Turkey, Beef, Chicken
3 Tsp – Tomato Paste
1 Tsp – Adobo sauce (Refer Notes)
½ Tsp – Chipotle Chile, minced finely
1 Slice – Bread
1 – Egg
½ Tsp – Rosemary
4 Cloves – Garlic, finely minced
4-6 Tbsp – Gorgonzola Cheese
Salt and pepper as per taste

For Garnish
Grilled Portobello mushrooms
Fresh Arugula
Cheese slices
Tomato

Direction
  • Take a big bowl, crack an egg into it and whisk well
  • Mix in rosemary, garlic, tomato paste, Adobe sauce and Chipotle Chile.
  • Pulse the bread slice in the food processor and add the ensuing crumbs to the bowl, along with the ground turkey.
  • Season with salt and pepper
  • Divide the meat into 4 equal parts. Take 1 portion and spread it on your palm into a 4 inch burger patty. Add 1-1 ½ Tbsp of Gorgonzola cheese in the middle and carefully seal to make it into a ball. Then flatten this meat ball softly into a burger patty.
  • Grease the grill plates and grill the burger over medium heat, turning once. The internal temperature of burger should reach 165 degrees F
  • Allow the cooked burgers to rest for 10 minutes.
  • Assemble the burger with your choice of add-ins and condiments
  • Enjoy every juicy bite of your own homemade burgers
Tips to make a good burger
  • Freeze the burger patty for 20-30 minutes to get a firmer patty; in case you are going to grill it on an outdoor grill, this will help the burger from falling apart on the grill.
  • I have been making burgers for the past few years and found that the best way to make a juicy one is to cook it on a stove top grill-plate rather than on an outdoor grill where the juices could all run down and result in a dry burger.
  • Overcooking will result in dry, tough burgers.
  • Turn the burger not more than once on each side.
  • Do not press the burgers while they are cooking. The juices will ooze out leaving you with a tough chunk of meat.
  • Use fresh meat instead of frozen meat.
  • Allow the burger to rest for 10 minutes after grilling
  • To avoid the burger patty to form rounded tops when cooking just make a small indentation in the center. This makes a uniform flat burger!
  • Do not over mix the meat.
Notes
  • Chipotle chile in Adobo sauce is available in most grocery stores, usually in the canned food section. The Chile is spicy so adjust these according to your palate.

April 12, 2012

Hyderabadi Mutton Biryani


    Finally I am posting a Biryani recipe even though I have prepared this dish quite a few times recently but was simply too lazy to organize my notes into the blog. Better late than never :)
    This particular recipe was handed down to from my paternal grandma who was quite the cook, very popular in our family circle for her exceptional culinary skills and variety. I still cherish those holiday get-together when the entire family would meet up to feast on the sumptuous dishes she prepared, with the Biryani being one of the highlight entrees. All the ladies in the house used to be part of this cooking extravaganza with my grandma typically leading the crew through the entire process, to get their magical dishes onto the table. I am proud and happy that I had the privilege to get my early cooking lessons under her tutelage.
    Back in those days, the Biryani was prepared in a sealed dish (Dum Biryani) and cooked over red hot coal instead of baking in an oven. That was indeed the traditional and authentic method of preparation, locking in the delectable flavor and aromas as it cooked. I guess being spoiled with such remarkable preparations of the Biryani during my childhood, explains why I just don’t enjoy a restaurant-prepared version of the dish to this very day!

    Here is a tale that I used to hear frequently from my Grandfather about his first and last cooking venture. He had a British colleague and friend who used to absolutely love Biryani and whose main dilemma while leaving India to go back to England was that he would miss the home-cooked authentic Biryani. A few years later when my Grandfather was visiting England, he decided to surprise his old friend with a good Biryani meal so he made my grandma pack the Basmati rice, the spices in labeled pouches and a detailed step-by-step recipe. Being the amateur cook that he was, unfortunately, the final dish was nothing compared to what my Grandma used to make but the gentlemen made merry of what was prepared and claim to have had a nice feast. My grandfather used to claim that it turned out edible but I still highly doubt that ;)

Serves 8

Ingredients

For Marinade
2 Lbs – Mutton/Goat meat , cut into 1.5 inch cubes
½ C – Yogurt
1 Tsp – Pepper
½ Tsp – Turmeric powder
2 Tbsp – Ginger-garlic paste
Salt

For Mutton
4 – Bay leaves
4 Cups – Onion
2 ½ Tbsp – Ginger-Garlic paste
2 ½ Tbsp – Coriander powder
1 Tsp – Jeera powder (Cumin powder)
1 Tsp – Garam Masala
2 ½ Tsp –Chilly powder
½ Tsp – Pepper
3 Tbsp – Tomato Paste
20 – Almonds or Cashew nuts
1 Tsp – Poppy seed
1 ½ Cup – water
½ Cup – Cilantro, chopped
¼ Cup – Mint, chopped
Oil or Ghee
Salt

For Rice
3 Cup – Basmati Rice
4 ½ Cup - Water
2 – Bay leaves
2 – Mace
8 – Green Cardamom
5 – 1 inch pieces of Cinnamon
10 – Cloves
3 Tbsp - Lemon juice
¼ Tsp - Saffron
Salt
Ghee or Oil

For Garnish
4 Boiled eggs
Fried Onions
Fried Raisins
Fried Cashew nuts
Chopped Cilantro
Chopped Mint

Directions
To cook Mutton
  • Wash and clean the meat and trim off excess fat. Dry with a paper towel.
  • Marinate the mutton in yogurt, turmeric powder, pepper, ginger-garlic paste and salt. Keep it aside and let it marinate for at least an hour.
  • Cover the pressure cooker and cook until 6 whistles on medium low.
  • While the mutton is cooking, heat ghee/oil in a heavy-bottomed pan and add Bay leaves. Sauté for a minute.
  • Add onions and ginger-garlic paste
  • Sauté until the mixture is golden-brown.It will take some time but your patience will pay off later!
  • In a bowl, take chilly powder, pepper,coriander powder, jeera powder, turmeric, tomato paste and garam masala and mix with ¼ Cup water. Add this to the sautéed onions and cook until all the water evaporates.
  • Stir in the cooked mutton.
  • Sauté for 5 minutes. Season with salt
  • Take a microwave safe bowl and add the Almonds with just enough water to soak them. Microwave for 1- 1 ½ minutes.Take it out of the microwave and let it cool. You should be able to peel the skin off the almonds easily now.
  • Add the almonds and poppy seeds in a blender and grind into a fine paste. Add this paste to the curry and cook until the meat is tender. The curry should not be watery but should have a thick gravy.
To cook Rice
  • Take a non-stick pan. Heat ghee/oil and add Bay leaves, Mace, Green Cardamom, Cinnamon and Cloves. Sauté fora minute.
  • Add rice and sauté for another 3-5 minutes
  • Mix in boiling water, lemon juice, salt and Saffron and cover-cook for 7 minutes on medium low heat or until rice absorbs all the water. Take off the heat. Keep the lid closed to cook the rice in the steam. Do not attempt to open the lid while the dish is still hot as you will lose the steam and the rice may not be cooked properly.
Assembly
  • Preheat the oven to 325F
  • Take a big oven-safe dish. Spoon in 1/3of the mutton curry on the bottom of the dish.
  • Spread 1/3 of the cooked rice on top. Do not use your hands to do this, use a spoon! Sprinkle some chopped Cilantro and Mint. Drizzle some ghee on top(optional)
  • Follow steps 2 and 3 until you are done with the rice and curry.
  • Cover and seal the dish. I usually seal my Biryani dish with chappati dough so that it is air-tight and the aroma of the spices are not lost. (This is optional; if you find this step tedious, just cover it as air-tight as possible and bake)
  • Bake for 35 -45 minutes
Garnish
  • Garnish the Biryani with fried onions,wedged boiled eggs, chopped cilantro, fried raisins and cashew nuts
Tips to make a good Biryani
  1. Good quality Basmati rice translates into a good Biryani.
  2. The rice should be cooked al dente (just right) – neither undercooked nor overcooked. Overcooked rice in Biryani is a very common problem
  3. Use fresh Ginger and Garlic. Never use the ready made ginger-garlic paste.
  4. Fresh herbs – The aroma and flavor of fresh mint and cilantro cannot be replaced by dry herbs.
  5. Make your own Garam Masala if possible and use whole spices for Rice as mentioned in the recipe above
  6. Use good quality ghee instead of oil. It improves the taste.
  7. Use Tomato paste instead of tomatoes, which contributes a concentrated tomatoey flavor without excess water. This also helps the biryani to stay fresh longer!
Notes
  • If you don’t have tomato paste, use three fresh medium sized tomatoes instead but make sure you sauté them well until all the water evaporates.
  • Make the rice in a non-stick pan to prevent the rice from sticking to the bottom of the pan.
  • Be gentle when you sauté the rice and also while spreading the rice while assembling the Biryani.
  • The mutton curry should not be watery but should have thick gravy. If the curry is watery, cook uncovered on medium high to get the desired consistency.
  • Serve with Raita and Mirchi Ka Salan


April 10, 2012

Mirchi Ka Salan / Fried Green Chilly in Peanut Sauce


Mirchi Ka Salan is one of those delectable side-dishes that makes for just the perfect Biryani accompaniment. The main ingredients are Mirchi a.k.a Green Chilly and peanuts.  First, the chillies are deep fried to bring out a smoky flavor and then cooked in a tangy peanut and sesame seed sauce, spiced with coriander, cumin and turmeric.
This relatively easy but flavorful preparation is sure to add some nice spunk to the entree. I picked this recipe up from my days in Hyderabad and since then I just must have this whenever I am all set to devour a plate of my favorite Biryani.


This recipe is adapted from Sanjeev Kapoor’s book.
 
Makes approx.  3 Cups
Ingredients
18-20 - Green chilly big        
2 Tbsp - Sesame seeds (til)
2 Tbsp - Coriander seeds        
1 Tsp - Cumin seeds      
½ Cup - Peanuts, roasted        
2 - Dry red chilies      
1 Inch - Ginger, roughly chopped        
6 - Garlic      
1 Tsp - Mustard seeds    
8-10 - Curry leaves      
1 - Onion, grated        
1 Tsp - Turmeric powder
2 Tbsp - Tamarind pulp
½ Tsp - Sugar
Oil
Salt     to taste
       
Directions
  • Slit Green chillies lengthwise without cutting the chillies into two.
  • Heat sufficient Olive oil in a kadai (Wok) and deep-fry the chillies for a minute. Drain and place on absorbent paper and set aside.
  • Dry-roast sesame seeds, coriander seeds and cumin seeds. Cool and grind them to a paste along with peanuts, whole dry red chillies, ginger and garlic.
  • Heat some oil in a pan, add mustard seeds, let them splutter and then add curry leaves.
  • Sauté onions until they are golden brown.
  • Add turmeric powder and mix well.
  • Add the above masala paste and cook for three minutes, stirring constantly. Stir in one-and-half cups of water and bring to a boil. Reduce heat and cook for ten minutes.
  • Add tamarind pulp (dissolved in half a cup of water, if it is too thick). Add sugar
  • Add fried green chillies and salt and cook on low heat for eight to ten minutes. Serve hot.
Notes and Tips
  • Variations: You can substitute okra(bhindi) or eggplant (brinjal) for green chilly

April 2, 2012

Tofu and Vegetables in Soy Peanut sauce


Getting back to work after a 2.5 year hiatus is tough indeed but a lot better than what I had anticipated. Being on an ever-constrained schedule these days,  I notice  that I have become much more organized than before and have even transformed into a 5:00 AM 'early bird' which is quite unlike me. I do manage to get time to cook too but hardly enough to do justice to my blog. Last night I attempted a vegetarian dish that I thought came out quite well and inspired me to pull out the camera to click a few pictures. This recipe is essentially an Asian style stir- fry with peanut-soy sauce that makes it slightly sweet and tangy. 

Serves 6

Ingredients 
1 pack (14oz / 400gm) – Firm Tofu
1 lb – Broccoli florets
1 – Red Bell pepper
1 - Yellow bell pepper
1 - Onion
6 cloves – Garlic
1 Tsp – Grated Ginger
Sesame oil
Salt to taste
1Tsp – Toasted Sesame seeds

Sauce 
¼ Cup – Peanut butter (I used the chunky version)
1/8 Cup – Soy Sauce
1/8 Cup - Honey
½ Cup – Tomato Ketchup
2 Tbsp – Worcestershire sauce
1 Cup – Water
1 Tsp – Lime Juice
½ Tsp - Paprika
½ Tsp – Grated Ginger
1 clove – Grated Garlic

Directions

  • Heat a tablespoon of sesame oil in a non-stick pan.
  • Season Tofu with salt and shallow fry until you get a dark golden color. Transfer Tofu to a dish
  • Add some more sesame oil to the pan.
  • Mix in crushed garlic, ginger and onions and sauté until the onions are translucent.
  • Stir in the Carrots, Broccoli, Bell-peppers and sauté for 5 mins. The vegetable should not be over cooked as they would lose the crunch and color. Transfer the vegetables to the dish along with the Tofu.
  • In a separate bowl, mix in all the ingredients for the sauce.
  • Add the sauce to the pan and when the sauce starts to bubble add the stir fried vegetables and Tofu. Toss everything together just until they are mixed. 
  • Garnish with toasted sesame seeds and chopped scallions

Notes and Tips

  • The vegetables should not be over cooked as they would lose the nice crunch and color
  • Using sesame oil not only improves the taste but is also a good oil for stir-frying due to its high smoke-point
  • The ingredients in the sauce have salt in them so be careful while seasoning with additional salt. 


LinkWithin

Related Posts Plugin for WordPress, Blogger...